by Liz Gonzales
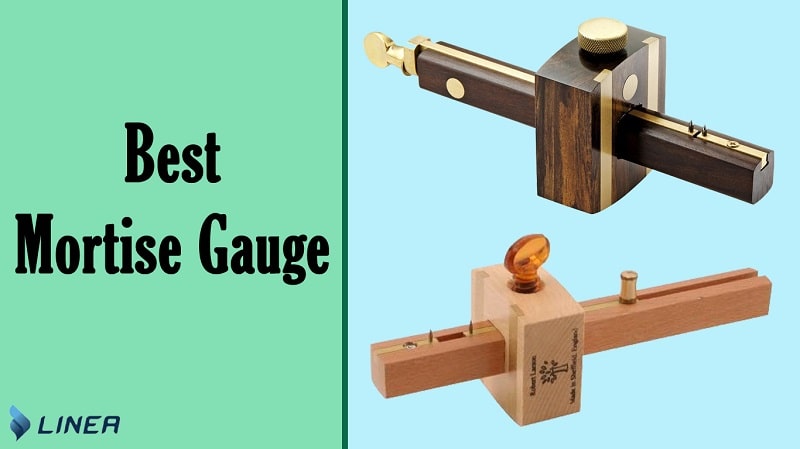
Anyone with much enthusiasm for woodwork would be thrilled to have a powerful mortise gauge for their activities. These tools are particular types of marking gauges that carpenters use to set marks on woods for the mortise to cut it through.
Mortise gauges have varying features and designs depending on your budget size. Most of them are made of hardwood, especially rosewood.
Contents
This guide's purpose is to highlight the best mortise gauges to consider in the market.
Take a look at the top 5 mortise gauges for your woodwork activities.


If you consider high-quality tools for your intense activity, you might want to select the Woodworking marking gauge as your purchase choice. The sturdy item has different materials; wood and brass.
The wood marking gauge measures around 6.5 by 2.6 by 2.2 inches. Let us check more of its features, benefits, pros alongside cons.
Features & Benefits:
Pros:
Cons:


iGauging mortise gauge gives you an excellent hairline layout over your wood grain. Its edge wheel produces awesome lines that do not rip up your wood material while marking.
Some of its features include:
Features & Benefits:
Pros:
Cons:


The most precious benefit of having the Clarke Brothers Wheel marking gauge is its time-efficient feature. You can easily complete your woodworking tasks with fewer hurdles. It is one of the best mortise gauges to include in your shopping cart.
Features & Benefits:
Maximum precision: The Clarke Brothers wheel marking gauge with a high-end wheel enables you to bring out parallel lines on the wooden material. It provides a clear indication of where to cut on the wood.
The superior graduation leaves marks on the bar that are both in imperial and metric versions. They might range from 150mm, which adds convenience to your woodworking tasks.
Durable material: The Clarke Brothers wheel marking gauge has an 8-inch lengthy graduated bar made of a solid brass and steel or aluminum alloy material. It does not support corrosion on its surface. The marking gauge has a non-marring brass face that safeguards it when not in use.
One-handed operation: It is a quick and simple to use tool for all of your woodworking activities. The exemplary cutting wheel component takes out all the fuss from your woodworking tool. The Clarke Brothers wheel marking gauge has a balanced structure that will cause fewer strains on your arms.
Pros:
Cons:


The Newkiton Dovetail Jig Wheel marking gauge comes in great handy for your woodwork projects. It has a fine thickness and ease of use feature suitable for both experienced and beginners. The item might serve as a perfect gift for the woodwork passion.
Features & Benefits:
Pros:
Cons:


The wood marking gauge is well-performing for woodwork tool enthusiasts. It has a relative dimension measurement of around 7.87 by 5.91 by 2.36 inches. The wood marking gauge weighs around 9.2 ounces and has red coloring surfaces.
Some of its additional features and benefits might include the following:
Features & Benefits:
Pros:
Cons:


Getting a mortise gauge is quite simple. You might acquire it from your local store or purchase it online. However, this task might be daunting for most beginners. They might be confused about the right features and designs to consider when purchasing a mortise gauge.
With this guide, you will get insightful information on the fundamental concepts to have at your fingertips when purchasing a mortise gauge. Take a look.
As we earlier mentioned, mortise gauges have different designs and features. Concerning structure, some mortise gauges might have pins while others might have discs. Both structures will assist in meeting your needs.
However, discs might be a little more brittle, therefore, a shorter lifespan. They are moreover tedious to sharpen and even worse once they break.
It would be wise to get yourself a combination mortise gauge that is a hybrid of both a marking and a mortise gauge.
Depending on your budget, mortise gauges have different price tags. Some might be more expensive due to their additional features and quality, unlike others. If you are within a tight budget, you might consider purchasing a second-hand mortise gauge.
Be it a new or a used marking item, be cautious on the pins' conditions. You might confirm if they have equal lengths for increased performance.
Instrument features play crucial roles when deciding whether to purchase a mortise gauge. Some might come with a bundle of additional designs that ease the tool performance.
For instance, a modern mortise gauge might come with a removable cutter with an increased woodwork quality. Others might have already-placed independent cutters quite adjustable to set your preferred width on the wooden fibers.

Now that you know the different factors to consider when buying a mortise gauge let us check on the different techniques on how to use one.
With the vast misleading information online, it might not be easy to get the most useful resources on handling a mortise gauge.
Some of the steps involved when using a mortise gauge might involve:
You might begin using your mortise gauge by first assembling the right tools needed, including a ruler, the mortise gauge itself, a pencil, or a chisel. Set out the gauge and plan out your measurements before estimating the dovetails.
Then, position your fence and adjust the right setting.
Curl your hand over the fence and beam. You might want to tilt the gauge and settle it on the lengthy-edged corner of the beam. It is the corner that is far distant from you.
Add some pressure on the fence to ensure a tight bond between the gauge and the wood. You can tilt the gauge towards your direction with the beam corner tightly attached to the wood.
The technique includes much pressure on the fence and beam edge. It is, therefore, less important to control the exerted pressure on the mortise gauge pin. However, you can apply less force when dealing with a softwood surface. It might leave clear marks that you easily see. Or, you might opt to employ increased pressure for a rough wood material to assist with the mark visibility.
Then, set a gauge some distance away from you. Ensure the lengthy beam edge is on the word. It would be helpful to set the gauge far away for you to see your current activities easily. Do not worry about the tilting of the pin. It will not dig much into the wood.
It might not be easy to control around when the gauge goes off at the board end. You might avoid it by halting the marking before the end of the line. You can redo the process from the other side of the board. Ensure to make a tilt on the gauge towards your direction this time.
It is quite helpful and crucial to have a light pencil mark rather than one with a denser contrast. In case you are having issues with the scribe marking, you can opt to pass your pencil through the groove. The pin sharpness entirely depends on your personal preference.
Have a firm hand and stop with the rush. The lines are critical in this activity. Creating unavoidable mistakes at this stage might affect your performance.
Before cutting out your word, ensure the measurements are ideal. It would be wise to redo the measuring several times.
A mortise gauge is a particular category of a marking gauge that you can use to create wood or metal work operations lines. The ultimate purpose of the gauge is to scribe lines that are perpendicular to the wood surface. Most of the involved operations are joinery and metal activities.
If you plan to use a metal surface, you might consider using a more reliable mortise gauge. Otherwise, it might be problematic to scratch a softer working surface such as normal steel.
It is simple to confuse a marking gauge with a mortise gauge. The two items, however, have ideological differences in their designs and features. The key difference between the two items is the number of present pins. A marking gauge tends to have a single pin, unlike a mortise gauge with double pins in its structure.
With a mortise gauge, you can scribe on both sides. That is why they are sometimes called combination mortise gauges. If you fail to confirm the pin's length, you might have more hurdles when using a mortise gauge.
It is not a must to have a mortise gauge. However, if you actively spend hours on woodwork activities, it would be best to get yourself at least a single mortise gauge. It is a suitable option to include in your toolbox.
Or, you can use a marking gauge as an alternative solution over a mortise gauge. The tool will still bring out the marks on your wood surface. It has a chisel component that measures the width.
Sometimes, it might not be easy to set up a mortise gauge for beginners in their first projects. Setting up a mortise gauge is quite simple. The initial step is to make holes and to adjust your twin pins or the tips.
You can then lock your screw for the pin to have a tight grip. The next step is to position your gauge on the wood surface and make accurate estimates of the pins' length.
You can then apply little pressure on the wood fiber pins after getting an accurate preferred adjustment. Try the exercise on both sides to ensure the markings come out well. You can assess the pins centering position on the gauge to ensure a higher performance.
There is a pool of various options when it comes to carpentry. They might include panel gauges, wheel marking gauges alongside the cutting gauges.
A panel gauge is a lengthy carpentry gauge with a beam feature. With this gauge, you can move to several feet depending on your woodwork project. One of the primary use of a panel gauge is to scribe wood boards to the precise widths.
Conversely, a cutting gauge is a unique carpentry tool with a knife instead of a pin when making marks on the working board. Most individuals prefer it when undertaking bigger projects. In contrast, a wheel marking gauge is a modern design with a metal rod and a ring. It is more expensive and higher performing than the cutting gauge.
Woodworking Marking Gauge, Ebony Mortise Square Gauge 6" Sliding Mark Scraper with Brass - Walmart Link
Mortise Gauge Woodworking Marking Gauge Ebony Mortise Square Gauge 6.4 Inches Sliding - Walmart Link
Ocamo Mortise Gauge, Multifunction Ebony Screw Type Marking Gauge Woodworking Measuring - Walmart Link
Contour Gauge Duplicator, West Bay 3 Pcs Profile Gauge Duplicator Copy Irregular Shapes - Walmart Link
Aouker Center Scriber Line Scriber Woodworking Marking Offset Marking Tool Marking Center - Walmart Link
Newkiton Wheel Marking Gauge Plus with Micro Adjust Function, 1 Bearing Wheel Cutter for - Walmart Link
Newkiton Wheel Marking Gauge, 1 Bearing Wheel Cutter for Soft Wood, 1 Locked Up Wheel - Walmart Link
Woodworking Marking Gauge, Ebony Mortise Square Gauge 6" Sliding Mark Scraper with Brass - eBay Link
Mortise Gauge Woodworking Marking Gauge Ebony Mortise Square Gauge 6.4 Inches Sliding - eBay Link
Ocamo Mortise Gauge, Multifunction Ebony Screw Type Marking Gauge Woodworking Measuring - eBay Link
Contour Gauge Duplicator, West Bay 3 Pcs Profile Gauge Duplicator Copy Irregular Shapes - eBay Link
Aouker Center Scriber Line Scriber Woodworking Marking Offset Marking Tool Marking Center - eBay Link
Newkiton Wheel Marking Gauge Plus with Micro Adjust Function, 1 Bearing Wheel Cutter for - eBay Link
Newkiton Wheel Marking Gauge, 1 Bearing Wheel Cutter for Soft Wood, 1 Locked Up Wheel - eBay Link
Mortise gauges are the go-to equipment for carpenters and individuals passionate about woodwork activities. They bring out your marking lines effectively with much precision before cutting out your wood surface.
With the diverse options of mortise gauges, it might be difficult for a beginner to select the smart solution during purchase. The guide has detailed out a useful piece of information to help you through with your purchasing decision.
One of the best mortise gauges is the Woodworking marking gauge tool, with vast benefits and features to meet your design needs. A beginner might consider it a bucket list item to enjoy its ease of use and increased quality. Also, the article has laid out a solid buying guide and step-by-step procedure on mortise gauges.
You can now comfortably purchase and set up your mortise gauge. Get your favorite mortise gauge and go on with what you love.
 |
 |
 |
 |

About Liz Gonzales
Liz lives in a suburb in New York city.
Both of her parents are the art professors at Sate University of New York.
As such, Liz grew up with all kinds of art objects, portraits, and books laying around the home.
Liz met up with Linea through another friend in some kind of online art forum. There great minds sparkled to take their passions onto the next level @ linea.io.
 |
 |
 |
 |
You can Get FREE Gifts. Furthermore, Free Items here. Disable Ad Blocker to receive them all.
Once done, hit anything below
 |
 |
 |
 |