
Have you ever watched candle wax pool across your hardwood floor and wondered if you'd ever get it back to its original luster? You will — and faster than you think. How to remove wax from hardwood floor is one of the most satisfying DIY jobs in the home, because the results are immediate and dramatic. Whether you're dealing with a fresh candle spill or a floor buried under decades of paste wax buildup, the right approach restores your floors without calling in a professional. It's a core skill in any serious cleaning routine, and this guide walks you through every step.
The two scenarios you'll face are fundamentally different. A candle spill is a localized, acute problem — hardened paraffin sitting on top of the finish. Floor wax buildup is a slow, cumulative one — layer after layer of paste or liquid wax turning yellow, trapping dirt, and killing the floor's natural depth. Both respond to the same core toolkit, but the technique differs. Before you reach for any solvent or start scraping, understand what you're dealing with. The wrong move on the wrong wax type doesn't just fail — it creates new damage.
Once the wax is completely removed, you'll face a follow-up decision: what goes on the floor next? If the existing finish is worn through, this is the perfect opportunity to read up on how to apply polyurethane to floors before committing to a product. Applying the wrong sealer over poorly prepared wood is one of the most expensive mistakes in floor care. But first — the wax.
Contents
Most homeowners don't recognize a wax problem until it's already significant. Paste wax and liquid floor wax are designed to be applied in thin coats — but over months and years, those coats stack. Each new application sits on top of the previous one, and without proper stripping in between, you end up with a thick, yellowing layer that traps dirt and kills the floor's reflective depth.
This is especially common on older floors that predate polyurethane finishes. Many hardwood floors built before the 1970s relied on wax as their primary protective coating — a practice with roots in early 20th-century home care, as wax's long history as a surface protectant makes clear. If you've moved into a home built before 1980, assume the floors have wax — often multiple generations of it.
Identifying your wax type before you start isn't optional — it determines which method works and which causes damage. The four main types you'll encounter:
If you're unsure what type of wax you're dealing with, test your chosen solvent on an inconspicuous corner — behind a door or inside a closet — before committing to the full floor. A finish that reacts poorly shows immediately on a small test patch.

Gather everything before you start. Running back to the store mid-job means leaving a partially stripped floor exposed to humidity and foot traffic — both of which complicate the finish. Here's your complete toolkit:
The one supply most guides leave off: a work lamp or flashlight. You'll use it for the raking-light inspection at the end — holding the light at a low angle to the floor surface to catch any wax haze that's invisible under overhead lighting. Don't skip this step.
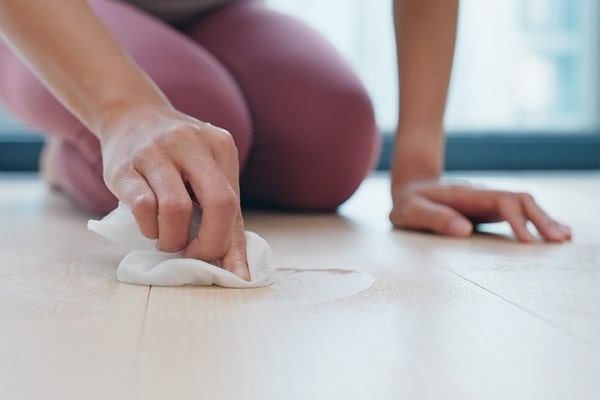
For candle wax and spot treatment, odorless mineral spirits remain the gold standard — effective, widely available, and gentle enough to use without stripping the floor finish when applied correctly. For whole-floor paste wax stripping, commercial products like Bona Hardwood Floor Cleaner or Bruce Hardwood Floor Cleaner are reliable and won't attack the underlying finish if used per label directions.
One critical warning: do not use steam cleaners on waxed hardwood. While steam cleaners are highly effective for disinfecting many household surfaces, the combination of heat and moisture forces water under the wax layer, warps wood grain, and can permanently raise the surface. This is a counterintuitive rule — steam feels like a powerful cleaning tool, and it is, just not here.
It's also worth knowing that tools and chemistry for hardwood wax removal differ substantially from what you'd use on other floor types. If you're also maintaining linoleum floors elsewhere in the house, keep your products completely separate. Some linoleum-safe strippers contain ingredients that etch polyurethane finishes on hardwood.
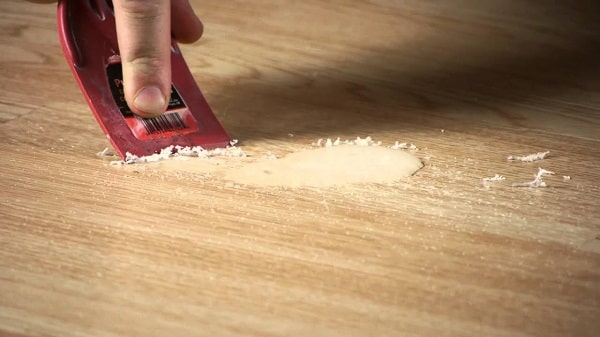
Speed matters here, but not in the direction most people assume. Do not try to wipe up hot or warm wax. You'll push it deeper into the grain and spread it across a larger surface area. Let it solidify first — then act.
Insider note: if you're dealing with colored candle wax — red, dark green, or black — the pigment can stain the grain even after the wax body is removed. After the bulk scrape, dab (don't rub) the stained area with rubbing alcohol on a cotton ball before applying mineral spirits. The alcohol breaks down the dye without spreading it.
This is the larger project, and the one most people underestimate. Stripping accumulated floor wax from a full room takes time, physical effort, and methodical execution. Plan for a full afternoon for a standard bedroom — longer for large rooms or heavy buildup.
After a full stripping, inspect the exposed finish carefully. You may find scratches, discoloration, or areas where the finish has worn through to bare wood — all previously hidden under wax. This is your best window to address them. Reapplying a protective coat over compromised areas is significantly easier before new wax or dirt accumulates. If the finish needs a full refresh, the guide on how to apply polyurethane to floors covers product selection and application technique in detail. Don't skip this step — bare wood absorbs moisture and stains rapidly.
The economics of DIY wax removal are compelling. Most of your supply investment is reusable across future maintenance sessions, and the labor cost is just your time. Here's a realistic breakdown for a standard 300–400 square foot room:
| Item | Estimated Cost | Notes |
|---|---|---|
| Odorless mineral spirits (quart) | $8–$14 | Covers ~200–300 sq ft of light-to-moderate buildup |
| Commercial floor wax stripper (32 oz) | $12–$22 | For paste or liquid wax; dilute per label instructions |
| #0000 steel wool pads (pack of 12) | $5–$9 | Reusable; replace when pads begin to disintegrate |
| Microfiber cloths (pack of 12) | $8–$16 | Buy more than you think — you'll go through them quickly |
| Plastic scraper set | $4–$7 | For candle wax removal only |
| Rubber gloves (box) | $5–$8 | Non-negotiable when working with any solvent |
| Total DIY | $42–$76 | One-time investment; most items last multiple projects |
Compare that to professional wax stripping services, which typically run $1.50–$3.00 per square foot. A 400 sq ft living room costs $600–$1,200 professionally. If the floor also needs refinishing afterward, add another $3–$5 per square foot. The DIY math is overwhelming for anyone willing to put in the afternoon.
There are specific situations where professional help is the correct call — not just the expensive one. Attempting DIY removal in these cases adds cost rather than saving it:
Budget decisions here also depend on your long-term flooring plans. If you're evaluating floor materials for other rooms in the home, understanding the maintenance cost differences between hardwood, laminate flooring, and floors with cork underlayment puts the lifetime cost of wax-based maintenance in sharper perspective. Many modern floor systems eliminate the wax cycle entirely.

Even experienced homeowners make avoidable errors when tackling wax removal for the first time. These are the ones that actually cost money:
These patterns fall squarely into the category of common home cleaning mistakes — each one seems logical in the moment but creates significantly more work later. Discipline in your process is what separates a clean result from a floor that needs professional intervention.
Once the wax is fully removed, your floors are back to a clean slate. What you put on them next — and how you maintain them going forward — determines whether you're back here in five years or twenty.
For a complete picture of routine floor maintenance, the guide on how to clean hardwood floors covers everything from daily sweeping technique to seasonal deep-cleaning strategies. Pair that knowledge with the wax removal process you now understand, and your floors will stay in excellent condition for years without professional intervention.
A hair dryer softens the wax, which makes it spreadable — not removable. Applying heat to candle wax on hardwood pushes it deeper into the grain and enlarges the affected area. Use the ice method instead: cold makes paraffin brittle and separates it cleanly from the finish without spreading it. Save the hair dryer for carpets, where wax can be blotted up through paper towels with gentle heat applied from above.
Applied correctly — to a cloth, not directly to the floor, and in small amounts — mineral spirits are safe on most hardwood finishes including polyurethane, shellac, and oil-based finishes. The risk comes from over-application and letting solvent pool or sit. Always test on a hidden corner first, work in small sections, and rinse each section promptly. Odorless mineral spirits are the milder option and are preferred for finished hardwood.
The clearest indicators are a dull, hazy appearance that doesn't improve with cleaning, yellowish discoloration in high-traffic areas, and a surface that feels slightly tacky underfoot. You can also perform a quick test: apply a few drops of mineral spirits to an inconspicuous spot and rub with a white cloth. If the cloth picks up a yellowish or brownish residue, you have wax buildup. A clean cloth means no wax — the floor has a different type of finish.
Vinegar does not remove wax. It's an acid that works well on mineral deposits and soap scum, but it has no chemical action against wax polymers. More critically, undiluted vinegar can dull polyurethane finishes over time by breaking down the surface layer. For wax removal, mineral spirits or a commercial floor wax stripper are the correct tools. Stick with pH-neutral cleaners for routine hardwood maintenance.
A standard 300–400 square foot room with moderate buildup takes four to six hours of active work, not including drying time. Heavy buildup — multiple decades of accumulated paste wax — can extend that to a full day. Factor in at least 24 hours of drying time before applying any new protective coat. Rushing the drying phase is the most common reason wax removal projects require a second round of work.
It depends on the condition of the underlying finish. If the original polyurethane or oil finish is intact and undamaged, a quality hardwood floor cleaner applied on a regular schedule is sufficient maintenance going forward. If the finish is worn, scratched, or shows bare wood in any area, apply a fresh protective coat before the floor sees regular foot traffic. Bare hardwood absorbs moisture and stains within days in a lived-in home.
 |
 |
 |
 |

About Linea Lorenzo
Linea Lorenzo has spent over a decade testing home gadgets, cleaning products, and consumer electronics from his base in Sacramento, California. What started as a personal obsession with keeping his space clean and stocked with the right tools evolved into a full-time writing career covering the home products space. He has hands-on experience with hundreds of cleaning solutions, robotic and cordless vacuums, and everyday household gadgets — evaluating them for performance, value, and real-world usability rather than spec sheet appeal. At Linea, he covers home cleaning guides, general how-to tutorials, and practical product advice for everyday home care.
You can Get FREE Gifts. Furthermore, Free Items here. Disable Ad Blocker to receive them all.
Once done, hit anything below
|
|
|
|