
Ever wondered if you can get professional-looking results without leaving your house? Learning how to laminate at home is more accessible than most people realize — and once you have the right setup, the process takes only a few minutes per item. Whether you want to protect a recipe card, preserve a child's drawing, or create durable reference sheets, home lamination delivers. Browse the full guide to laminating to see all your options before you buy anything.

Lamination is the process of sealing a document between two layers of clear plastic film, bonded together by heat or pressure. The finished product is waterproof, tear-resistant, and built to handle daily use. According to Wikipedia, lamination is used in industries from packaging to publishing — but at home, the goal is almost always document protection and presentation.
The barrier to entry has never been lower. Entry-level machines cost less than most small kitchen appliances, the technique takes minutes to learn, and the materials are widely available. This guide covers everything you need: tools, technique, use cases, common pitfalls, and how to keep laminated items looking sharp over time.
Contents
A thermal laminating machine is the most reliable option for home use. It uses heated rollers to melt the adhesive inside a laminating pouch, fusing the plastic film to both sides of your document simultaneously. Most home models handle standard letter-size sheets and accept pouch thicknesses from 3 mil to 10 mil. Thicker pouches produce a stiffer, more durable result — ideal for ID cards, bookmarks, or anything that sees heavy daily handling. Machines typically need 3 to 5 minutes to warm up before use.
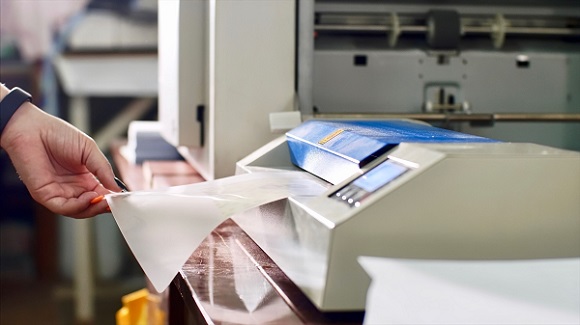
Pouches come in standard sizes — business card, letter, legal, and tabloid. Each pouch is sealed on one short edge and open on the other three. You slide your document in from the open end, then feed it into the machine sealed-edge first. That sealed-edge-first rule is non-negotiable: reversing it causes the rollers to peel the layers apart mid-run and jam the machine every time.
If you don't own a machine, self-adhesive laminating sheets are a practical workaround. You peel back the protective liner, press the sheet onto your document, and smooth it down by hand. The result isn't as rigid or durable as heat lamination, but it works well for lightweight projects like flash cards, small labels, and decorative items. A hard, clean surface and a credit card for smoothing are the only tools you need.

Start by making sure your document is completely dry. If you've just printed something on an inkjet printer, wait at least 60 seconds before inserting it into a pouch. Wet ink smears inside the sealed film and ruins the document. It's also worth knowing that printer ink degrades over time, so laminating soon after printing is the best way to lock in quality for anything you want to keep permanently.
Slide your document into the pouch with a small border of clear film around all four edges — at least 1/8 inch on the sides and bottom, slightly more on the top. This clear border forms the seal that holds everything together. Place the loaded pouch on a flat surface, sealed edge toward the machine's feed slot, and guide it in gently. Let the rollers draw it through at their own pace. Do not push or pull the pouch while it's moving.
Pro tip: After the pouch exits the machine, place it flat under a heavy book for two minutes. This prevents curling while the adhesive sets fully.
Self-adhesive sheets demand a clean workspace. Even a single dust particle trapped under the film appears as a visible bubble. Peel back about two inches of the backing, align the adhesive side over your document, press firmly, then slowly peel away the remaining backing while smoothing the sheet down as you go. Work from one end to the other without lifting the sheet once contact is made. Finish by running a flat edge firmly across the entire surface to eliminate any remaining air pockets.
Lamination works best on flat, paper-based items that don't contain heat-sensitive components. Recipe cards, reference sheets, children's artwork, educational flash cards, chore charts, and homemade bookmarks are all excellent candidates. Any document you handle frequently and want to preserve long-term is a strong candidate. If you're organizing your home and want laminated labels and instruction sheets to survive a deep clean, pairing lamination with a consistent routine — like the one in our spring cleaning guide — keeps everything in order.
| Item Type | Best Method | Recommended Thickness | Expected Result |
|---|---|---|---|
| Recipe cards | Thermal machine | 5 mil | Excellent |
| Children's artwork | Thermal machine | 3 mil | Excellent |
| ID badges / cards | Thermal machine | 10 mil | Excellent |
| Bookmarks | Self-adhesive sheet | N/A | Good |
| Glossy photographs | Self-adhesive sheet | N/A | Good (avoid heat) |
| Thermal paper receipts | Not recommended | N/A | Will turn black |
| Items over 1/8" thick | Not recommended | N/A | Machine jam risk |
Thermal paper — the shiny kind used for receipts and some shipping labels — turns completely black under heat. Never run it through a thermal laminator. Glossy photo paper can yellow or warp at high temperatures; use self-adhesive sheets for photographs instead. Items with glitter, foil accents, or embossed elements frequently trap air beneath the film, producing bubbles that no amount of re-running will eliminate.
The cost advantage is immediate. A home laminating machine pays for itself after just a few uses compared to print-shop rates. You also get instant turnaround with no waiting in line or shipping delay. Home lamination gives you direct control over quality, including pouch thickness, trim dimensions, and timing. Properly laminated items are waterproof, tear-resistant, and significantly more durable than unprotected paper — a meaningful difference for anything stored near moisture or handled by children.
Most home machines are limited to letter-size documents. Anything larger requires a commercial machine or a different approach. The process is also permanent — once a document is sealed inside a pouch, there's no practical way to update or replace it without starting fresh. That makes proofreading before laminating an absolute must. And while the machines themselves are affordable, the pouches are a recurring cost that adds up if you laminate frequently.
Trim your document before laminating, not after. Sharp scissors or a rotary paper trimmer give you cleaner edges than trying to cut through hardened film. Keep that border of clear film around the document intact — it's the structural seal. If you trim into the sealed area, moisture can slowly work its way in over time and cause delamination. When laminating multiple sheets back to back, let the machine rest briefly between passes. Continuous use builds heat inside the rollers that can cause warping on subsequent runs.
A rotary trimmer with a rolling blade is worth the investment if you laminate more than occasionally. It produces perfectly straight cuts without the jagging you sometimes get from scissors. For a polished finish, use a corner rounder punch to round each corner after trimming. Rounded corners prevent the film from peeling at the edges and make your finished items look intentional rather than homemade — a small detail that makes a noticeable difference.
Warning: Never fold or crease a laminated item — this cracks the film and permanently breaks the moisture seal along the fold line.
Bubbles are the most frequent complaint. They usually indicate insufficient heat, a pouch fed too quickly, or dust trapped on the document surface. Run the sheet through again at a slightly slower speed. If bubbles persist across multiple passes, the pouch batch itself may be defective — switch to a new one and test before continuing.
Jams happen when the pouch is fed open-edge first or when two sheets are accidentally fed simultaneously. If a jam occurs, power the machine off immediately. Most machines include a reverse function — use it to back the pouch out slowly and steadily. Never yank. If film has melted onto the rollers, let the machine cool completely before wiping the rollers with a slightly damp cloth. Forcing a hot roller clean causes permanent damage.
Curling after lamination usually means the temperature setting was too high for the document weight, or the pouch thickness was too heavy for thin paper. Switch to a 3 mil pouch for lightweight sheets, and always rest finished pieces flat while they cool.
Laminated surfaces are designed to be easy to clean — that's a core reason people laminate in the first place. A damp cloth removes most dirt, fingerprints, and grease without any special products. For stubborn marks, a small amount of dish soap on the cloth handles the job without damaging the film. Avoid abrasive cleaners and scrubbing pads entirely — they scratch the surface and create a permanent haze that no amount of polishing will reverse. The same principle applies to laminated labels or protective sheets on furniture surfaces; gentle care extends the life of both. For broader surface maintenance around the home, our guide on cleaning household furniture properly offers a useful step-by-step framework.
Store flat laminated items horizontally in a drawer or folder rather than stacking them vertically under pressure. Vertical stacking creates stress points that gradually warp the film. Keep laminated pieces away from prolonged direct sunlight — even UV-stable film degrades faster under constant exposure. If an item begins peeling at the edges, re-laminating with a fresh pouch is the cleanest fix. There is no reliable method to re-seal a delaminating pouch once the bond has broken along the edge.
Yes. Self-adhesive laminating sheets let you laminate documents by hand with no heat required. The result is thinner and less rigid than thermal lamination, but perfectly adequate for lightweight items like bookmarks, flash cards, and small labels.
Use 3 mil for lightweight paper and documents you want to remain flexible. Use 5 mil for general-purpose lamination like recipe cards and reference sheets. Use 10 mil for ID cards, badges, or anything that needs to be stiff and highly durable.
You can, but thermal machines can yellow or warp glossy photo paper at high heat. Use self-adhesive laminating sheets for photographs instead — they bond without heat and preserve image quality reliably.
Bubbles result from trapped air, dust on the document surface, or insufficient heat during sealing. Clean the document before inserting it into the pouch, and run it through the machine again at a slower feed speed if bubbles appear after the first pass.
A well-laminated item stored away from prolonged direct sunlight can last for decades without degrading. The seal holds indefinitely under normal handling conditions as long as the edges remain intact and the film isn't cracked or folded.
Yes, with the right marker. Dry-erase markers work on laminated surfaces and wipe off cleanly with a cloth. Permanent markers also adhere well if you want to add notes that stay. Standard ballpoint pens will not write on most laminating film.
 |
 |
 |
 |

About Linea Lorenzo
Linea Lorenzo has spent over a decade testing home gadgets, cleaning products, and consumer electronics from his base in Sacramento, California. What started as a personal obsession with keeping his space clean and stocked with the right tools evolved into a full-time writing career covering the home products space. He has hands-on experience with hundreds of cleaning solutions, robotic and cordless vacuums, and everyday household gadgets — evaluating them for performance, value, and real-world usability rather than spec sheet appeal. At Linea, he covers home cleaning guides, general how-to tutorials, and practical product advice for everyday home care.
You can Get FREE Gifts. Furthermore, Free Items here. Disable Ad Blocker to receive them all.
Once done, hit anything below
|
|
|
|