
You remove ceramic tiles by breaking the grout lines with a chisel, prying each tile up from the substrate, and scraping the adhesive residue until the surface is flat enough for new flooring. The process is straightforward but physically demanding, and knowing how to remove ceramic tiles the right way saves you from cracked subfloors, unnecessary dust exposure, and hours of extra cleanup. Whether you're renovating a bathroom, updating a kitchen backsplash, or dealing with cracked ceramic tiles that are beyond saving, this guide walks you through every step from first swing to final sweep.
Ceramic tile removal is one of those jobs that looks simple on the surface but punishes shortcuts. Rush through the preparation stage and you risk gouging your subfloor, sending silica dust into your lungs, or discovering mid-project that your tiles were set in a mortar bed rather than thinset — a distinction that changes your entire approach. The good news is that with the right tools and a methodical process, most homeowners can handle a standard tile removal over a single weekend.
Below you'll find a complete breakdown of the tools you need, the costs involved, expert techniques for different scenarios, and the common mistakes that turn a manageable project into a frustrating ordeal.
Contents
Not every damaged or outdated tile floor requires a full tear-out, and understanding when removal makes sense prevents you from starting a project you didn't actually need.
Having the right tools before you start is the single biggest factor in how smoothly your tile removal goes, and skipping even one essential item tends to stall the entire project mid-way through.
Safety first: Always wear ANSI-rated safety glasses, cut-resistant gloves, knee pads, and an N95 respirator when removing ceramic tiles — broken tile edges are razor-sharp, and the dust contains silica particles that damage lung tissue with repeated exposure.
Understanding the real costs helps you decide whether learning how to remove ceramic tiles yourself is worth the labor, or whether hiring a contractor makes more financial sense for your specific situation.
| Expense | DIY Cost | Professional Cost |
|---|---|---|
| Hand tools (chisel, hammer, scraper) | $30–$60 | Included |
| Rotary hammer drill (rental, 1 day) | $45–$70 | Included |
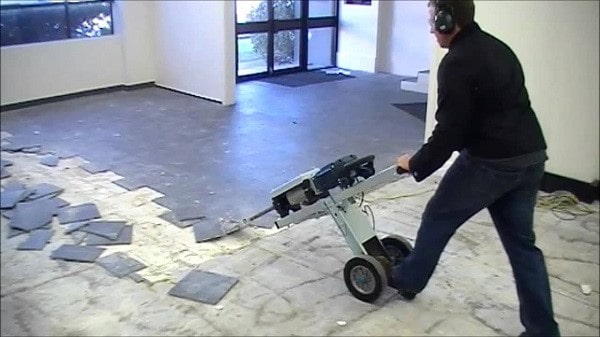
| Floor scraper machine (rental, 1 day) | $60–$120 | Included |
| Safety equipment (respirator, glasses, gloves) | $25–$40 | Included |
| Disposal / dumpster rental | $150–$350 | $150–$350 |
| Labor (per sq ft) | $0 (your time) | $3–$6 |
| Total for 150 sq ft room | $310–$640 | $600–$1,250 |
For most rooms under 200 square feet, DIY removal saves you roughly 40–50% compared to hiring a professional, though that calculation changes if your tiles are set in a thick mortar bed or if the subfloor needs significant repair afterward.
Before committing a full weekend to this project, weigh these advantages and drawbacks honestly against your skill level and available time.
Advantages:
Drawbacks:
Pro tip: Work in 45-minute intervals with 15-minute breaks to prevent repetitive strain injuries in your wrists and shoulders — tile removal is a marathon, not a sprint, and pushing through fatigue leads to sloppy chisel work and subfloor gouges.
Once the tile is up and the subfloor is clean, regular vacuuming of each room in your cleaning routine keeps residual construction dust from migrating through the rest of your home during the renovation process.
Ceramic tiles bonded directly to a concrete slab are typically the hardest to remove because the thinset forms an extremely strong mechanical bond with the porous concrete surface. A rotary hammer drill with a wide chisel bit is practically mandatory here, as hand tools alone will exhaust you before you finish a single row. Expect the concrete surface to have a rough, pitted texture after removal — this is normal and actually beneficial for the adhesion of your next flooring material, though you may need to apply a self-leveling compound if the pitting is severe or uneven across the room.
When tiles are installed over plywood, the cement board backer is usually screwed to the plywood subfloor, and the tiles are bonded to the cement board with thinset. In many cases, the fastest approach is to remove the entire cement board with the tiles still attached rather than chiseling each tile individually. Unscrew the cement board panels, break them into manageable sections, and pull them up as complete assemblies. This approach eliminates the adhesive scraping step entirely and gives you a clean plywood surface ready for new underlayment. Check the plywood for water damage at every seam and around any plumbing penetrations before installing new material on top.
A standard bathroom (40–60 square feet) takes most homeowners 3–5 hours for tile removal and another 2–3 hours for adhesive scraping and cleanup, assuming tiles were set with thinset on cement board rather than a thick mortar bed.
Yes, provided the existing tile is firmly bonded, level, and structurally sound — you'll need to sand the glazed surface for adhesion, use a modified thinset designed for tile-over-tile applications, and verify that the added height won't cause transition problems at doorways.
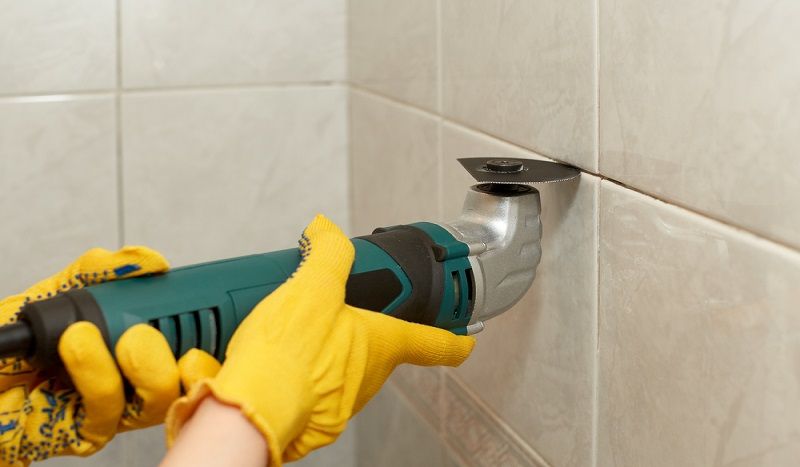
Start at the top row and work downward, using a stiff putty knife or chisel driven behind each tile at a shallow angle. Wall tiles are typically set with mastic rather than thinset, which releases more easily with moderate prying force.
For new tile installation, the thinset must be scraped to within 1/8 inch of flat so the new thinset bonds properly. For vinyl or laminate, the surface needs to be completely smooth — any remaining ridges will telegraph through the finished floor.
Use a sharp chisel held at a low 20–30 degree angle with controlled taps rather than heavy strikes, and always work the chisel parallel to the subfloor surface rather than digging downward into it.
DIY removal typically costs $310–$640 for a 150 square foot room (tools and disposal), compared to $600–$1,250 for professional removal — a savings of roughly 40–50% on labor-intensive but low-skill work.
Stop work immediately, ventilate the area, and assess the extent of the mold growth. Small patches (under 10 square feet) can be treated with a commercial mold remediation product, but larger areas or mold in the subfloor material itself require professional remediation.
It can if you apply too much downward pressure or use a narrow chisel bit on plywood subfloors. Use a wide-blade chisel attachment, keep the tool angle shallow, and let the hammer action do the work rather than forcing the bit into the substrate.
Now that you know how to remove ceramic tiles safely and efficiently, the best thing you can do is pick one small section — a bathroom corner, a backsplash edge, or a closet floor — and practice your chisel technique before committing to the full room. Gather your tools, set up your dust containment, and start that first tile this weekend. The hardest part is always the first swing, and once you see how manageable the process really is, you'll have the confidence to tackle the rest of the floor without hesitation.
 |
 |
 |
 |

About Liz Gonzales
Liz Gonzales grew up surrounded by art and design in a New York suburb, with both parents teaching studio arts at the State University of New York. That environment sharpened her eye for aesthetics and spatial detail — skills she now applies to evaluating home products where form and function both matter. She has spent the past several years writing about lighting, home decor accessories, and outdoor living gear, with a particular focus on how products perform in real residential settings rather than showrooms. At Linea, she covers lighting fixtures and bulb reviews, outdoor and patio gear, and general home product comparisons.
You can Get FREE Gifts. Furthermore, Free Items here. Disable Ad Blocker to receive them all.
Once done, hit anything below
|
|
|
|